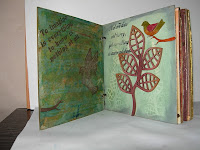
Best get on with it with. Glue was used on this 6" x 6" Tando sheet with varying degrees of success. This layer of watered PVA glue has been painted over a layer of acrylic paint.
Over which was painted more acrylic paint.
I do not know if the glue was to wet or if there was to much water in the mix or if it was just the wrong kind of glue, I've not used this one for the technique previously. Usually as it dries it cracks nicely but not this time.
So plan 2 a layer of gold acrylic paint went on. Yes I do use 'artist' paints such as this from a well known art and craft supermarket or more often branded paints. The thick pigment gives excellent coverage and value for money in my view.
Some text was randomly stamped onto the page once the paint was dry.
Still looking for a cracked effect Viva Croco was spread thinly over the page. The stamp used on the previous stage cleaned and dampened with water pressed into the wet paste. If you do this you must clean the stamp at once you do not want the paste to dry on the rubber.
As the paste dries the appear, this was a think layer so the cracks are very fine. All the layers below add depth and texture to the finished background.
Of course there has to be a Tando bird and branch. If you think I'm a bit addicted to Viva you are probably right! To color the little pieces of Tando Chipboard I used Viva Gloss Gel. This is wonderfully thick pretty much stays where you put it. 2 Birds and branches were coloured as the final layout had not been decided on.
For the Tando Frame Flower it was Viva Inca gold, the center of the flow pushed out and coloured with more Gloss Gel.
On the reverse of the page, the back cover of the book decided to use a paper napkin which uses the Union Jack as its pattern. Tando is a Great British Product proud to proclaim it.
Cover the Tando sheet with Modge Dodge
Lay the top, patterned, layer of the paper napkin directly on top allowing the paper to adsorb the modge podge.
Once dry with the napkin completely attached a layer of PVA glue was spread over it.
Alcohol inks and mixative dripped onto to top. The inks spread in the wet glue. The mixative is less easily absorbed.
When dry the appearance changes to a gloss finish.
Well thats all folks! Hope you have enjoyed this as much as I have and that you will have a go at some if not all the techniques used. There is a linky below that will remain open for 4 weeks but if you have a project to share later please leave a comment and a link we would love to see what you do.
I'll leave you now with pictures of the finished project, all the pages were punched with a Cropadile and held together with Tim Holtz D rings


Hi Zoe I followed a link from your blog and have just found this on-line lesson. The book is fantastic and so many different techniques used with great results. I shall revisit and give some of them a go. Thanks Sandra XX
ReplyDeleteGlad you found your way here Sandra be great to see you join in and share some of your work. XOXO Zoe
ReplyDelete