
First of all, here is Dana's fabulous tutorial for her Speech Bubble Cupcakes:

I am excited to share this tutorial for Tando Creative's Third Birthday Celebration! When I think of birthdays, thoughts of cake, candles and fun colors come to mind. I recently melted some crayons for a project. As I was working, I noticed that a pool of swirled, melted wax was collected on my craft mat. I thought it would be fun to see if I could transfer the pattern onto a piece of chipboard for use as a fun and funky background, reminiscent of the colored drips of melted candle wax atop birthday cake candles. I am thrilled with the results!

Supplies:
Small Speech Bubbles
Computer-Generated Sentiments
Crayons
Glue
Heat Gun
Tweezers Craft Mat Paint (optional)
Shimmer Spray (optional)
Rhinestones (optional)

Step One: Cover the edges of the speech bubbles with a coat of paint. Note: This step is optional. I like the finished look the painted edges give to my finished project.

Step Two: Remove the paper from the crayons and glue to a piece of heavy chipboard. Note: Gluing the crayons to a piece of chipboard helps hold the crayons in place while melting and provides a safe place to hold the crayons while keeping your hand protected from the heat during the melting process.

Step Three: Using a heat gun, melt the crayons onto a non-stick craft mat. Note: A hair dryer works well for gently melting the crayons, but will not provide the heat necessary to produce a large pool of melted wax needed for this project.

Step Four: Once there is a nice pool of melted crayon on the craft mat, quickly dip the speech bubbles into the hot melted crayons. Using tweezers carefully lift the chipboard from the melted crayons.

Step Five: Check that the entire piece of chipboard is covered with crayon. Any blank areas can be re-dipped into the melted crayon by applying more heat to the cooled pool of wax on the craft mat. Any raised areas of crayon on the chipboard can be smoothed out by applying heat to the chipboard with the heat gun. Be careful not to apply too much heat, or put the heat gun too close to the chipboard, or the crayons will melt off the chipboard.

Step Six: I like to add sparkle to my projects so I brushed on a layer of Shimmer Texture Spray. The Goosebumps gives the chipboard a glossy, sparkly finish. (This step is optional.)

Step Seven: Add the computer-generated sentiments and rhinestones to the speech bubbles. Attach a stick to each speech bubble, insert into cupcakes, and enjoy!

And now this is my tutorial (Kaz):
It would be very difficult for me to choose 3 of my favourite products from Tando, so I’m picking 3 groups of things.
1. The fact you get the inserts from the arches etc to create on.
2. Masks. I love them. I think you may have noticed that by now.
3. The Minis ranges. They are just perfect for accents on projects.
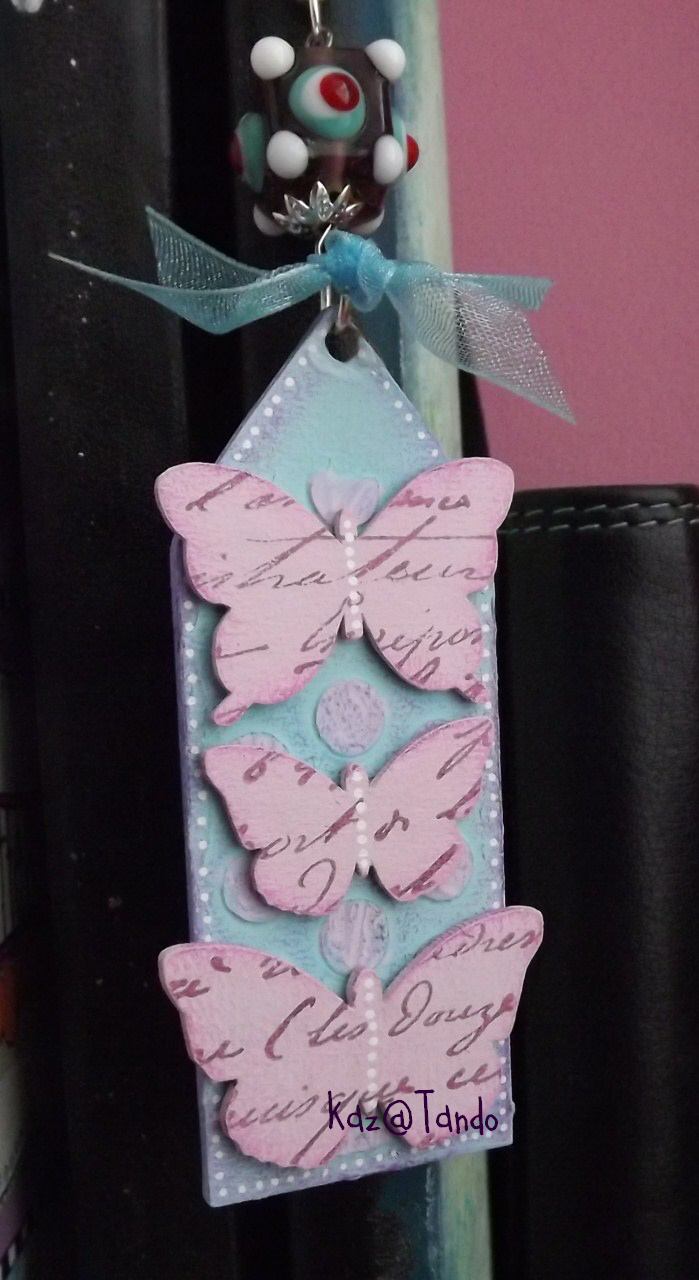
So I’ve used these 3 things to make a bookmark.
First off, take the small insert from the Triple Arched Layer Frame and add texture paste through the Sequin Waste Mask and leave it to dry. It doesn’t have to be perfect, ridges and gaps will add to the effect later. Clean the mask straight away so the paste doesn’t harden on it!

Once the paste is dry, paint both sides with acrylic paint, then paint just the raised bits a different colour. Paint the butterflies and hearts (not shown) as well.

Rub some oil pastel onto your finger and then rub your finger around the edge and over the edges of the raised bits.

Stamp a text stamp onto the Minis and rub some oil pastel around the edges.

Add some white dots around the tag and on the butterflies. Uni Posca pens work perfectly over the oil pastels.

Punch a hole in the top of the tag and attach to a metal bookmark, adding beads and ribbons until you are happy with the result.

Kaz xxx
Now.....we really want to see your take on this
project and, if you do, just pop a link in the Linky tool below and you will be
entered into a prize draw to win some super Tando goodies with a retail value of
no less than £20.00.....how cool is that!
You don't have to copy exactly but use some of
the fabulous techniques you've seen here in your projects.
Just leave a link to your blog or online gallery
in the comments box so we can pop over and take a look :o)
We will announce the winners on Monday 15th
October so you have plenty of time to complete these.
Pop back tomorrow for more :o)
Love these projects right up my street, must go get the crayons out me thinks, x awesome makes
ReplyDeleteI love the idea of melting ordinary wax crayons Dana! Beautiful effect xxx
ReplyDeleteWow, wouldn't have thought melting crayons would give such a lovely effect. Love the pastel colours on the bookmark and the double sided effect.
ReplyDeleteGreat effect with the melted crayons - fun and funky! The bookmark looks gorgeous, I'd probably end up admiring it rather than reading the book!
ReplyDeleteWhat good clear instructions girls thanks. I love the idea of melting wax crayons, the effect is "far out!"
ReplyDelete:)
Hi Dana, what type of crayons did you use cos I tried this and the colours all ran together and ended up a brownish puddle. Any tips??
ReplyDeleteI used cheap crayons, something that you may find at a discount store. They were quite soft. I haven't tried this tutorial with Crayola brand crayons, which are more expensive. I hope that helps. Please let me know if you have any more questions. =)
ReplyDeleteHi Dana, I have now completed a project with this technique and emailed it to Carol (since I have her email) to post for this challenge. I ended up mixing my fluid washy colours with a harder crayon which worked. Also the pictures don't show the really nice texture you get with this technique. I have done some encaustic art before but because you apply a thin layer you don't get the texture as with this technique. Very pleasing
ReplyDelete